Contents
こちらを参考にさせていただきました。

準備
プリンタ本体
スター精密さんに問い合せてみた。
Amazonよりお安い通販サイトを教えてもらいつつ、なんと2週間デモ機を無料で貸し出してくれた!
紙も2ロールついてて、非常にありがたい。
実装準備
めっちゃ簡単。
NuGetで3つインストールするだけ。
<PackageReference Include="StarMicronics.StarIODeviceSetting.Desktop" Version="1.0.0" />
<PackageReference Include="StarMicronics.StarIO.Desktop.StrongName" Version="2.9.1" />
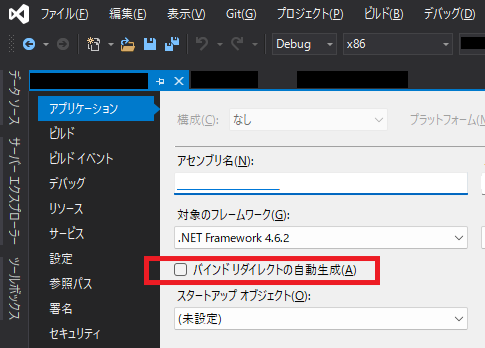
<PackageReference Include="StarMicronics.StarIOExtension.Desktop.StrongName" Version="1.8.0" />バージョンの競合警告が出るようなら、バインドリダイレクトの自動生成をONにすれば消える。
実装
ヘッダー、13桁バーコード、QRコード、フッターを印刷するコード。
公式ドキュメント通りにやればOKだけど、日本語ならSJISエンコードになるので注意。
あと、改行コードを忘れずに。
/// <summary>
/// 印刷
/// </summary>
/// <returns>成否</returns>
public bool Print()
{
    IPort port = null;
    try
    {
        // 接続、今回はmc-Print2固定
        port = Factory.I.GetPort("USBPRN:Star MCP21/20", "", 5000);
        StarPrinterStatus status = port.BeginCheckedBlock();
        if (status.Offline)
        {
            throw new PortException("Printer is Offline."
                                    + (status.ReceiptPaperEmpty ? "\nPaper is Empty." : "")
                                    + (status.CoverOpen ? "\nCover is Open." : ""));
        }
        // 印刷
        byte[] cmd = CreateCommand();
        uint commandsLength = (uint)cmd.Length;
        uint writtenLength = port.WritePort(cmd, 0, commandsLength);

        // 結果判定
        if (writtenLength != commandsLength)
        {
            throw new PortException("WritePort failed.");
        }
        status = port.EndCheckedBlock();
        if (status.Offline)
        {
            throw new PortException("Printer is Offline."
                                    + (status.ReceiptPaperEmpty ? "\nPaper is Empty." : "")
                                    + (status.CoverOpen ? "\nCover is Open." : ""));
        }

        // ここまでくれば正常
        return true;
    }
    catch (Exception e)
    {
        return false;
    }
    finally
    {
        if (port != null)
        {
            Factory.I.ReleasePort(port);
        }
    }
}

/// <summary>
/// 印刷コマンド生成
/// </summary>
/// <returns>生成結果</returns>
private byte[] CreateCommand()
{
    ICommandBuilder builder = StarIoExt.CreateCommandBuilder(Emulation.StarPRNT);
    builder.BeginDocument();
    Encoding encoding = Encoding.GetEncoding("SJIS");

    // ヘッダ
    builder.AppendFontStyle(FontStyleType.B);
    builder.AppendAlignment(AlignmentPosition.Center);
    builder.Append(encoding.GetBytes("ヘッダ文言\n"));
    builder.Append(encoding.GetBytes("\n"));

    // 13桁のバーコード
    // チェックデジットは自動でつくので1桁落としておく
    builder.AppendBarcode(encoding.GetBytes("123456789012"), BarcodeSymbology.JAN13, BarcodeWidth.Mode1, 40, true);
    builder.Append(encoding.GetBytes("\n"));

    builder.AppendAlignment(AlignmentPosition.Center);
    // 前後にスペースがあった方がいい感じ
    builder.Append(encoding.GetBytes("\n"));
    builder.AppendQrCode(encoding.GetBytes("hogehogeQRコード"), QrCodeModel.No2, QrCodeLevel.M, 2);
    builder.Append(encoding.GetBytes("\n"));

    // フッター
    builder.AppendFontStyle(FontStyleType.B);
    builder.AppendAlignment(AlignmentPosition.Center);
    builder.Append(encoding.GetBytes("フッター\n"));

    // 用紙カット
    builder.AppendCutPaper(CutPaperAction.PartialCutWithFeed);
    builder.EndDocument();
    return builder.Commands;
}
QRコード
AppendQrCodeの引数を決める
今回はベタ書きなので、QRコードのモデルは2、誤り訂正レベルはM、セル数(バージョン)は2で固定してるけど、実際は動的に判断が必要なんだろうな。
実際に印刷してみると、バージョン7までが印刷できました。
8以降はエラーにはならないけど、何も印刷されない。
なので、バージョン7のMレベルのビット数992を上限に設定しておく。
詳細に求めるのは面倒なので、全部Mレベルで、ビット数に応じてセル数を変更していく。
あまりにも小さいデータだけ、レベルを細分化する。
/// <summary>
/// QRコード印刷範囲(bit数)
/// </summary>
private const int BIT_LIMIT_IN_QRCODE = 992;

/// <summary>
/// バージョン1からのQRコードの誤り訂正レベルMのデータビット数
/// </summary>
int[] QR_CODE_LEVEL_M = new int[]
{
    128 , 224, 352, 512, 688, 864, 992, 1232, 1456, 1728,
    2032, 2320, 2672, 2920, 3320, 3624, 4056, 4504, 5016, 5352,
    5712, 6256, 6880, 7312, 8000, 8496, 9024, 9544, 10136, 10984,
    11640, 12328, 13048, 13800, 14496, 15312, 15936, 16816, 17728, 18672
};

/// <summary>
/// QRコードのサイズや誤り訂正レベルを求める
/// </summary>
/// <param name="bitCount">ビット数</param>
/// <param name="model">モデル</param>
/// <param name="level">レベル</param>
/// <param name="cell">セル数</param>
private void GetQRCodeInfo(int bitCount, out QrCodeModel model, out QrCodeLevel level, out int cell)
{
    // こちらを参考にQRコードのサイズや誤り訂正レベルを決める
    // https://www.qrcode.com/about/version.html

    // モデル1は古いので2固定
    model = QrCodeModel.No2;
    level = QrCodeLevel.M;
    cell = 1;
    if (bitCount < 176)
    {
        // バージョン1
        cell = 1;
        level = bitCount <= 72 ? QrCodeLevel.H : (bitCount <= 104 ? QrCodeLevel.Q : QrCodeLevel.M);
    }
    else if (bitCount <= BIT_LIMIT_IN_QRCODE)
    {
        for (int i = QR_CODE_LEVEL_M.Length - 1; 0 <= i; i--)
        {
            if(QR_CODE_LEVEL_M[i] < bitCount)
            {
                cell = i + 1;
                break;
            }
        };
    }
    else
    {
        throw new ArgumentOutOfRangeException(bitCount + "bit is not supported.");
    }
}
ビット数の求め方
上記はビット数から各種情報を決めるが、そもそもビット数を求めなきゃならん。
これであってる?
/// <summary>
/// QRコードの総ビット数を求める
/// </summary>
/// <param name="text">データ</param>
/// <returns>総ビット数</returns>
public int CountQRBit(string text)
{
    int ret = 0;
    if (System.Text.RegularExpressions.Regex.IsMatch(text, @"^[0-9a-zA-Z]+$"))
    {
        // 半角英数字のみ
        // モードインジケーター(4)
        // 文字数インジケーター(9)
        // データ(11×桁数を2で割った商)+(余り=0のとき0、余り=1のとき6)
        ret = 4 + 9;
        ret += 11 * (text.Length / 2);
        if (text.Length % 2 != 0)
        {
            ret += 6;
        }
    }
    else
    {
        // 半角英数字以外の混在
        // モードインジケーター(4)
        // 文字数インジケーター(8)
        // データ(13×桁数)
        ret = 4 + 8 + (13 * text.Length);
    }
    return ret;
}
動作確認
プリンタのドライバをインストールして、電源入れて、USBケーブルで接続して、いざ実行!
URLのような小さいデータならすごく小さくなるけど、QRコード含め、印刷できた。
100桁近くの日本語だと、バージョン7で幅いっぱいに使うけど、どちらもバーコードリーダーで正常に読めました。

実際は印刷しながらレイアウトを調整したので、山のように印刷した。
ちなみに、このプリンタ、通常のプリンタと同じように扱える。
例えば適当なPDFを開いて、サーマルプリンタを選択して印刷することもできる。
試しにやってみたら、1m以上の白紙の後、最後にチマっと印刷された。不思議。
他にもニッチなIT関連要素をまとめていますので、よければ一覧記事もご覧ください。
